Settings Page
The Settings page allows you to manage your personal account, business details, integrations, timezone preferences, and password security.
This section helps you customize your account and ensure that all connected services work correctly with the AutopubliX platform.
To open this sidebar, navigate to:
Navigation: Dashboard → SettingsWhat You Can Do on This Page
The Settings page provides multiple configuration sections that allow you to manage your profile information, connect social media accounts, integrate online stores, configure your timezone, and update your account password.
The page is organized into the following tabs:

- General : Manage personal profile and business information.
- Social Connections : Connect or manage linked social media accounts.
- Store Connections : Integrate eCommerce stores (Enterprise plan only).
- Timezone : Configure preferred timezone for scheduling.
- Change Password : Set or update your account password.
- Share my access : Share your account access with others.
Each tab provides specific configuration options for your account.
General Settings
The General tab is split into two sections: Profile and Business Information. This is where you maintain your identity and company details.
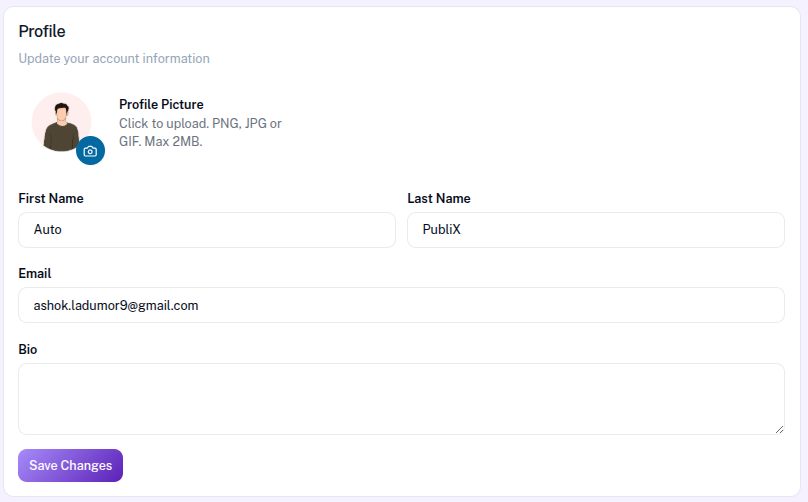
Profile Information
The Profile Information section allows you to manage your personal account details within the platform. Here, you can upload a profile picture that represents your account. Supported image formats include PNG, JPG, and GIF, with a maximum file size of 2MB. To update your image, simply click on the profile picture area and upload a new file. You can also update your first name and last name, which are used to identify your account within the system.
In addition, this section displays the email address associated with your account, which is used for login and important account notifications. You can also add a bio, where you can write a short description about yourself or your business to personalize your profile. After making any changes, click the Save Changes button to store and update your profile information in the system.
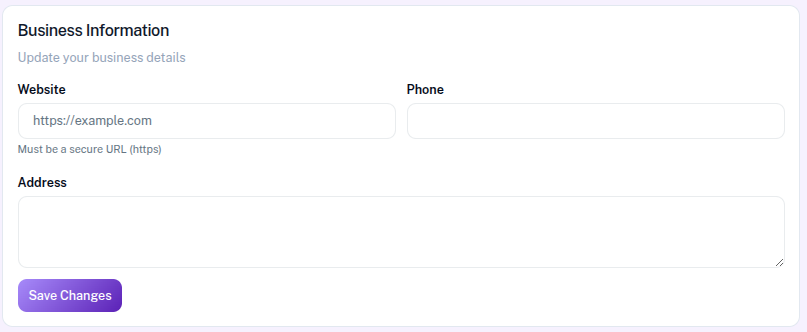
Business Information
The Business Information section allows you to add and manage important details related to your business. In this section, you can provide your website URL, which should be entered in a secure format using https (for example: https://example.com). Adding your official website helps identify your business and ensures that your account information remains complete and professional.
You can also enter your business phone number and address, which serve as your official contact details. These fields help store essential information that may be used for communication, identification, or business records. After entering or updating the details, click the Save Changes button to securely store your business information in the system.
Social Connections
The Social Connections section allows you to connect and manage your social media accounts.
Connecting social accounts enables AutopubliX to publish posts, automate replies, and track performance analytics.
Supported platforms include:
- Instagram (Business and creator account)
- Facebook (Multiple pages)
- X (Twitter)
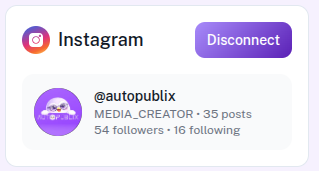
Instagram Connection
To connect your Instagram account, click the Connect button. You will be redirected to the official Instagram authorization page where you need to log in and grant the required permissions, such as access for posting content, viewing analytics, and running automation features. Once you approve the permissions, your Instagram account will be successfully connected and ready to use on the platform.
Displays the connected Instagram account information, including:
- Username
- Profile Picture
- Account Type (Business or Creator)
- Post Count
- Followers
- Following
If the account is connected, you can disconnect it using the Disconnect button.
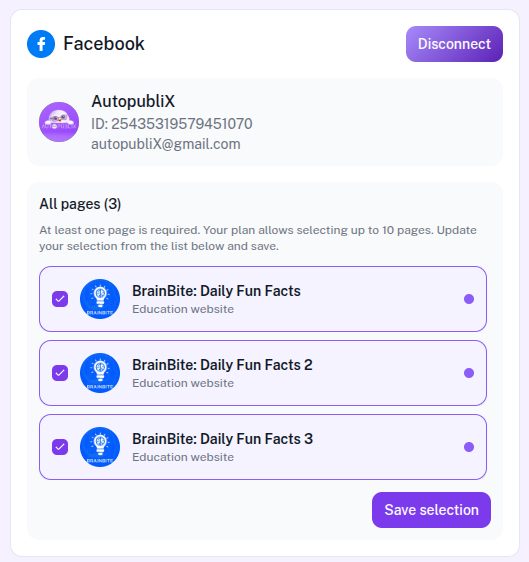
Facebook Connection
To connect your Facebook account, click the Connect button. You will be redirected to the official Facebook authorization page where you need to log in and grant the required permissions, such as access for posting content, viewing analytics, and running automation features. Once you approve the permissions, your Facebook account will be successfully connected and ready to use on the platform.
Displayed details include:
- Account name
- Account ID
- Email associated with the Facebook account
You can also select which Facebook pages should be connected.
Your subscription plan determines the maximum number of pages that can be connected.
After selecting pages, click Save Selection to confirm the connection.
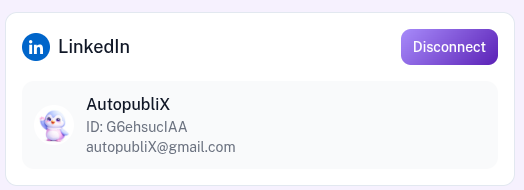
LinkedIn Connection
To connect your LinkedIn account, click the Connect button. You will be redirected to the official LinkedIn authorization page where you need to log in and grant the required permissions, such as access for posting content and viewing analytics. Once you approve the permissions, your LinkedIn account will be successfully connected and ready to use on the platform.
This section displays the LinkedIn account currently connected to your AutopubliX account.
Displayed details include:
- Profile name
- Account ID
- Email address
- Profile Picture
If the account is connected, you can disconnect it using the Disconnect button.
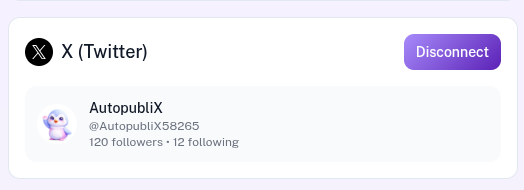
X (Twitter) Connection
To connect your X (Twitter) account, click the Connect button. You will be redirected to the official X (Twitter) authorization page where you need to log in and grant the required permissions, such as access for posting content and viewing analytics. Once you approve the permissions, your X (Twitter) account will be successfully connected and ready to use on the platform.
This section shows the X (Twitter) account that is currently connected to your AutopubliX account.
Displayed details include:
- Account name
- Username (Twitter handle)
- follower statistics
If the account is connected, you can disconnect it using the Disconnect button.
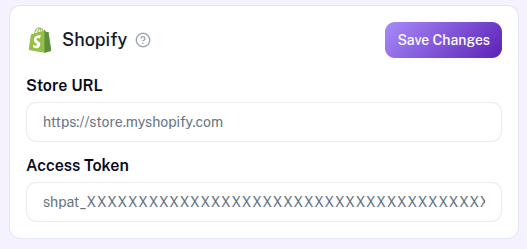
Store Connections
The Store Connections section allows you to integrate your eCommerce stores with the AutopubliX platform.
This integration enables import of products details to the our post create and edit page inside of the text editor.
Supported platforms include:
- WooCommerce
- Shopify
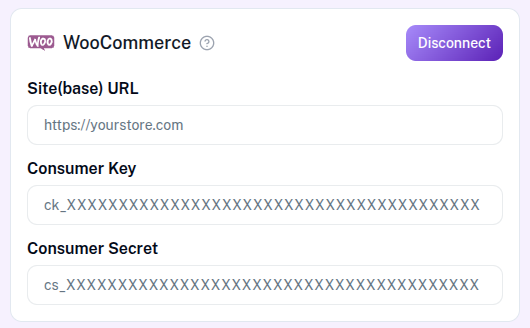
WooCommerce Integration
When you connect your WooCommerce store, the platform can automatically access and display all products available in your store. This integration is used on the Manage Posts, allowing you to easily browse and select products directly from your WooCommerce catalog without manually copying product information.
Once a product is selected and inserted, the system will automatically populate the product details, such as the title, description, product link and more details into the post editor. This helps you quickly create product-focused posts while ensuring that the information matches your store listings.
Shopify Integration
When you connect your Shopify store, the platform can automatically access and display all products available in your store. This integration is used on the Manage Posts, allowing you to easily browse and select products directly from your Shopify catalog without manually copying product information.
Once a product is selected and inserted, the system will automatically populate the product details, such as the title, description, product link and more details into the post editor. This helps you quickly create product-focused posts while ensuring that the information matches your store listings.
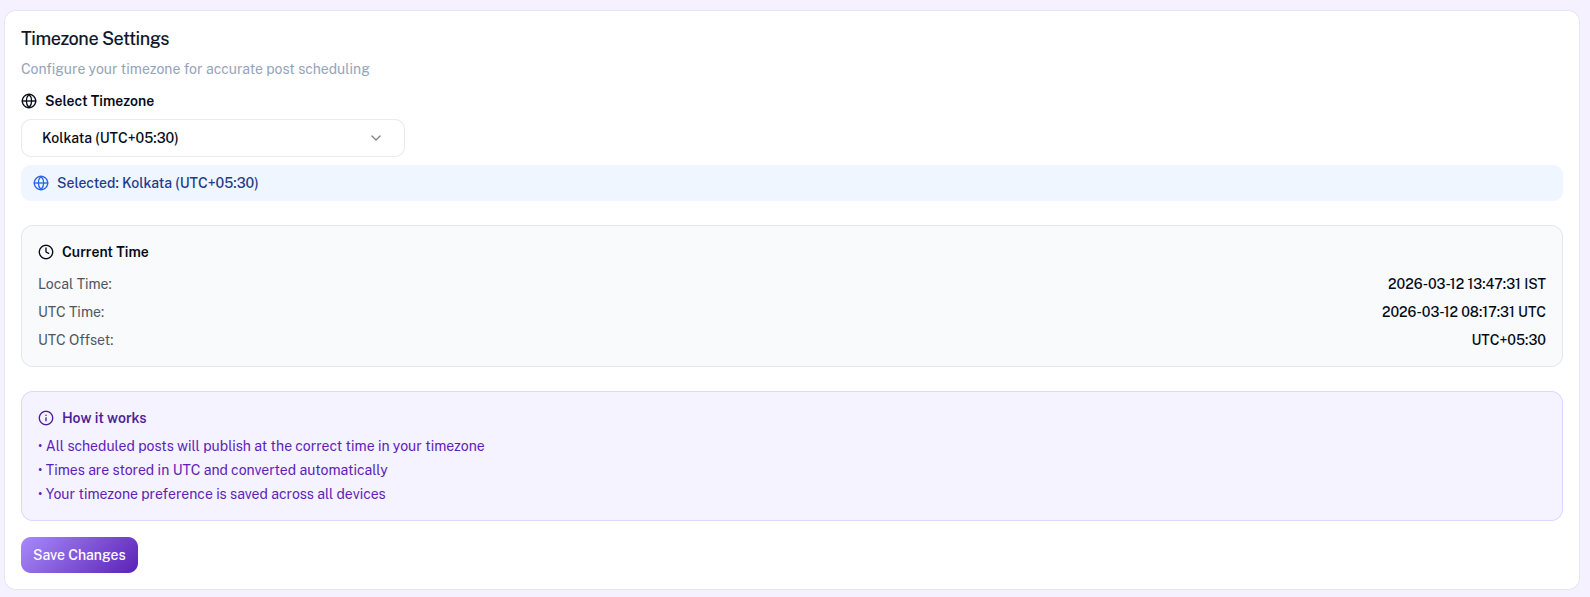
Timezone Settings
The Timezone section allows you to select your preferred timezone to ensure that posts and automations are scheduled accurately. You can choose your timezone from the dropdown list, such as Kolkata (UTC+05:30). Once a timezone is selected, the system will display the chosen timezone so you can confirm your preference.
The system also shows the current time based on the selected timezone, including the Local Time, UTC Time, and UTC Offset. This information helps verify that the timezone configuration is correct and ensures that all scheduled activities follow the correct time reference.
All scheduled posts will be published according to the timezone you select. While the system stores time values in UTC, they are automatically converted to your selected timezone when scheduling or publishing posts. Your timezone preference is applied across all devices, and you can click Save Changes to apply and store the selected timezone.
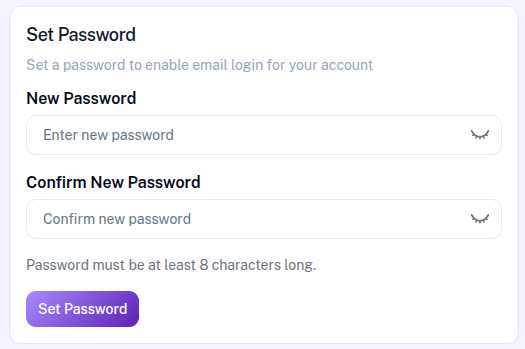
Change Password
The Change Password section allows you to update your account password to help keep your account secure. In this section, you need to enter a new password and then re-enter it in the Confirm New Password field to verify that both entries match.
For security purposes, the password must contain at least 8 characters. Using a strong and unique password helps protect your account from unauthorized access. After entering the required information, click the Set Password button to update your password. Once the password is successfully saved, the new password will be used for all future logins to your account.
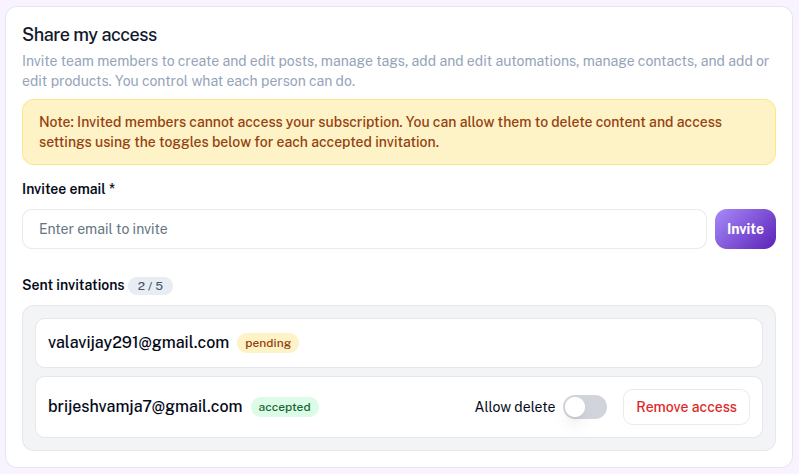
Share my access
The Share My Access section allows you to securely invite team members to collaborate on your AutoPubliX account. By entering an email address, you can send an invitation that enables others to Manage Posts, manage tags, manage media library, handle automations, manage contacts, and work with products. This feature is ideal for teams who want to collaborate while maintaining control over account permissions.
Once an invitation is sent, it will appear in the Sent Invitations list with its current status, such as pending or accepted. You can easily track who has access to your account and manage their permissions accordingly. For accepted users, additional controls like Allow Delete can be toggled to define what actions they are permitted to perform.
For security and control, invited members do not have access to subscription settings. You can also revoke access at any time using the Remove Access option. This ensures that you maintain full ownership of your account while still enabling efficient team collaboration.